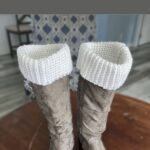
Quick and Easy Boot Cuffs Free Crochet Pattern
Stay cozy and stylish all season long with these Easy Winter White Crochet Boot Cuffs! This beginner-friendly pattern works up quickly, taking only about an hour or two, making it a perfect last-minute project or handmade gift. The soft ribbed texture and classic winter white color add just the right amount of charm to any cold-weather outfit.
Share by Email
Save
Equipment
- 1 Crochet Hook Size I 5.5mm
- 1 Scissors
- 1 Tapestry Needle
Materials
- 120 yards Caron Simply Soft Yarn in the color white
Instructions
- Begin with the Band. The part that is inside the boot.
- Start by making a slip knot and adding the loop on the hook.
- Work enough chains to make your desired length.
- For this pattern I worked a chain of 47 stitches.
- Row 1
- SK 1 ST, work a SC in the next ST and each ST across. Turn (46 STs)
- Rows 2-10
- CH 1 (Does not count as a ST). SC in the first ST and each ST across. Turn (46 STs)
- Work the Ribbing. The part that is outside of the boot.
- For this part, you will be working short rows on the long part of the band.
- A few notes before we get started.
- Forward Rows and Return Rows. The forward rows are the rows worked while moving away from the band. Return rows are those worked moving back toward the band.
- Slip Stitches. Work 2 or 3 slip stitches at the end of the return rows. One is to anchor the return row and the next one or two are to set up for the next forward row.
- Begin Ribbed Border
- Join the yarn to a corner on one of the sides of your crochet project. Attach your yarn for the ribbing with the front side facing you.
- Work 11 CH STs.
- Now we’ll work back down the chain toward the edge of the blanket or crochet project.
- Row 1
- Work a SC into the second chain and in each ST across. Next, work a SL ST back into the SP where we joined our yarn. Work 1 SL ST into the next 2 STs. (10 STs)
- Row 2
- Turn your work. SK the 3 SL STS. Work a SC BLO into each the first SC ST and each ST across. (Forward pass completed). Begin the return pass. CH 1, SC BLO into the first ST and each ST across. Work a SL ST back into the base of the row in the body of the project. And work a SL ST into the next 2 STs. (10 STs)
- *For my boot cuff ribbing there should be 10 SC BLO and 3 SL STs.
- Rows 3 and beyond
- Continue to repeat row 2.
- Sewing the Ends Together
- When you’re done, leave a long tail. About 15-20 inches. You will be using this to sew the ends together. This will create a “tube” shape.
- Seaming Instructions
- Fold the boot cuff in half matching the ends together.
- Use the long yarn tail and yarn needle to sew the ends together. Starting on one end, insert the hook through the loops on the end of each side. Move the needle over a little, insert it back through the layers and out the other end. Continue working back and forth weaving the yarn through the layers.
- When done, weave in the yarn ends and cut off the excess yarn.
Notes
Gauge
Approximately 12 stitches and 13 rows every 4 inches.
For accurate size, check your gauge as your crochet stitches may be looser or tighter than mine.
Size
5 inches wide x 15 inches long.
Changing the size
While this pattern comes in just one size, it is easy to change the size to fit your leg. Measure your leg where you want to boot cuff to sit. Crochet the initial band (chain stitches) to this size, then continue on with the pattern.
Abbreviations
- CH = Chain Stitch
- SC = Single Crochet Stitch
- SK = Skip
- SC BLO = Single Crochet Back Loop
- ST = Stitch
- STs = Stitches
- [ ] = Repeat Between
Want a copy to keep?
Use the print button on the pattern card to print a paper copy or save the pattern as a PDF to your device for future use. Just make sure to sign up for the newsletter first.