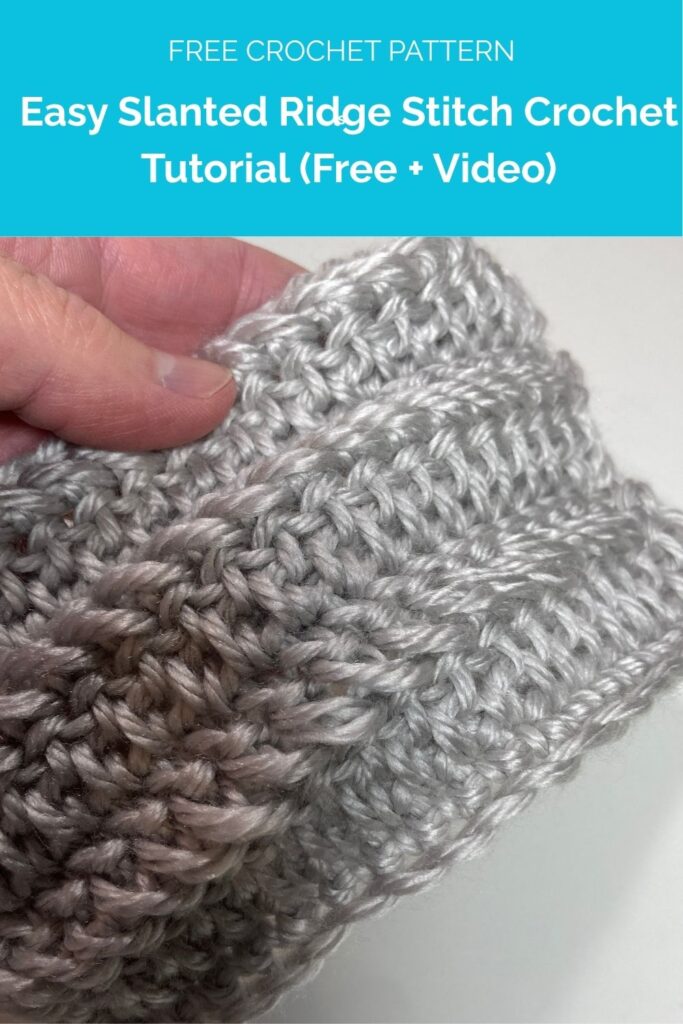
If you love trying new crochet stitches, the easy Slanted Ridge Stitch is one you’ll want to add to your repertoire. This beautifully textured stitch creates soft diagonal ridges that look amazing in everything from blankets and scarves to hats and sweaters.
It’s an easy stitch with a unique twist, making it a fun addition to your crochet skill set. And the best part? There’s a free tutorial and video to walk you through every step.
The inspiration for this stitch came from my love of the herringbone single crochet.
Free pattern by Victoria Pietz from Pattern Princess
I’ve always adored its woven look—but I wanted a bit more height, something closer to a double crochet. After experimenting with a few stitch combinations (and more than a few test swatches!), I finally found the perfect blend that created the diagonal texture I envisioned. The result was this new favorite, the Slanted Ridge Stitch.
This stitch combines the best elements of the herringbone single crochet and double crochet to form a pattern that’s both structured and soft. You’ll yarn over, insert your hook into the lower leg of the previous stitch and the next stitch, then pull through and finish like a traditional double crochet.
The motion may feel new at first, but once you get into the rhythm, it’s relaxing and satisfying to work up.
Use the Slanted Ridge Stitch in any project where you want a bit of texture and movement. It’s ideal for cozy throws, dishcloths, cowls, or even a modern-style cardigan.
The gentle diagonal ridges add visual interest without being too busy, making it a perfect choice for both solid and variegated yarns. With this stitch in your crochet toolbox, the creative possibilities are endless.
Victoria Pietz from Pattern Princess
Skill Level
Confident Beginner Crocheter.
You should be able to read a crochet pattern and work double crochet stitches and chain stitches.
Gauge
For the sample shown in the video, I used a medium weight yarn. The gauge will depend on your yarn and crochet hook size.
Size
The size will depend on your number of starting chains and rows.
Note. To change the size, you can use any number of beginning chain stitches.
Abbreviations
- CH = Chain
- DC = Double Crochet
- SK = Skip
- SL ST = Slip Stitch
- ST = Stitch
- STs = Stitches
- [ ] = Repeat Between
Materials
Yarn. While you can use any yarn weight for this pattern, I suggest a worsted weight yarn to practice.
Crochet hook size that matches your yarn weight. Such as a size H 5.0 mm crochet hook or I 5.5 mm crochet hook.
Scissors
Tapestry needle
Crochet Pattern Notes
Written in US terms.
You can links to video tutorials for both a left and right hand crocheter after the written pattern.
Begin
Chain Stitches. Start with a Slip Knot. Place a slip knot on your crochet hook.
Work a starting chain using any number of stitches.
Row 1
Insert hook into the second chain and work a SC and in each stitch across. Turn
Row 2
CH 2 (Counts as a DC). In the next ST work 1 DC. [In the next ST, YO and insert the hook into the front bottom loop on the left lower leg of the DC ST you just worked, then in the next ST. YO and pull up a loop. There should be 4 loops on the hook, YO and pull through 3 loops. YO and pull through the last two loops on the hook. Repeat between [ ] to the end.
Rows 3 and beyond
Repeat row 2.
Finishing
When you have reached your desired length, cut the yarn leaving about a 12-inch yarn tail. Pull the yarn tail through the last stitch.
Use the yarn needle to weave the yarn through the crochet stitches to secure.
You can find the video tutorials on our YouTube Channel
Slanted Ridge Stitch Videos
Easy Slanted Ridge Stitch Crochet Tutorial (Free + Video)
Equipment
- 1 Crochet Hook A size that matches your yarn weight. Such as a size H 5.0 mm crochet hook or I 5.5 mm crochet hook.
- 1 Scissors
- 1 Tapestry Needle
Materials
- 85 Yards Yarn While you can use any yarn weight for this pattern. I suggest a worsted weight yarn to practice.
Instructions
- Start with a Slip Knot. Place a slip knot on your crochet hook. Work a starting chain using any number of stitches.85 Yards Yarn
Row 1
- Insert hook into the second chain and work a SC and in each stitch across. Turn
Row 2
- CH 2 (Counts as a DC). In the next ST work 1 DC. [In the next ST, YO and insert the hook into the front bottom loop on the left lower leg of the DC ST you just worked, then in the next ST. YO and pull up a loop. There should be 4 loops on the hook, YO and pull through 3 loops. YO and pull through the last two loops on the hook. Repeat between [ ] to the end.
Rows 3 and beyond
- Repeat row 2.
Finishing
- When you have reached your desired length, cut the yarn leaving about a 12-inch yarn tail. Pull the yarn tail through the last stitch. Use the yarn needle to weave the yarn through the crochet stitches to secure.
Notes
Skill Level
Confident Beginner Crocheter. You should be able to read a crochet pattern and work double crochet stitches and chain stitches.Gauge
For the sample shown in the video, I used a medium weight yarn. The gauge will depend on your yarn and crochet hook size.Size
The size will depend on your number of starting chains and rows. Note. To change the size, you can use any number of beginning chain stitches.Abbreviations
- CH = Chain
- DC = Double Crochet
- SK = Skip
- SL ST = Slip Stitch
- ST = Stitch
- STs = Stitches
- [ ] = Repeat Between
Materials
Yarn. While you can use any yarn weight for this pattern, I suggest a worsted weight yarn to practice. Crochet hook size that matches your yarn weight. Such as a size H 5.0 mm crochet hook or I 5.5 mm crochet hook. Scissors Tapestry needleCrochet Pattern Notes
Written in US terms. You can find a video tutorial for both a left and right hand crocheter after the written pattern.Slanted Ridge Stitch Videos
Right Hand https://youtu.be/vLG_3Xdw2aU Left Hand https://youtu.be/wWtcTgwNXZcWant a copy to keep?
Use the print button on the pattern card to print a paper copy or save the pattern as a PDF to your device for future use. Just make sure to sign up for the newsletter first.