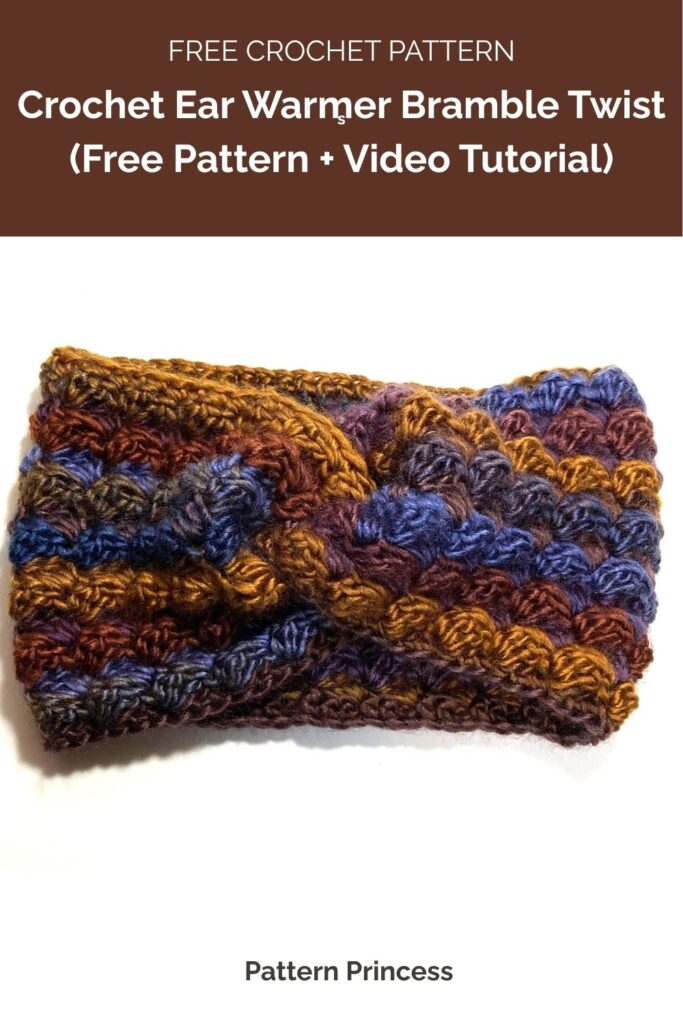
Get ready to crochet a cozy and stylish accessory with the Easy Crochet Ear Warmer Bramble Twist. This free pattern and video tutorial walks you through how to make a soft, textured ear warmer that’s as beautiful as it is practical.
It’s one of those quick projects you’ll want to make again and again. Perfect for keeping warm on chilly days or gifting to someone special.
The Bramble Twist Ear Warmer features a gorgeous textured stitch that adds depth and interest while staying wonderfully soft and stretchy.
Free pattern by Victoria Pietz from Pattern Princess
The twist front design gives it a polished, store-bought look that’s flattering on everyone. Whether you’re wearing your hair down, in a messy bun, or a ponytail, this headband-style ear warmer is a stylish way to stay cozy without the bulk of a hat.
One of the best things about this pattern is how quick and simple it is to make. It took me under an hour to finish one, making it an ideal last-minute handmade gift.
You’ll only need one skein or less of yarn, making it a great stash buster too! The pattern is easy to customize for any head size, and it looks stunning in every color; from soft neutrals to bold winter shades.
Perfect for beginners looking to expand their crochet skills or experienced makers wanting a relaxing project, the Bramble Twist Ear Warmer is sure to become a new favorite. Pair it with your favorite scarf or jacket for a complete handmade look, and you’ll be ready to take on the cold in comfort and style.
Victoria Pietz from Pattern Princess
Skill Level
Easy – confident beginner
Gauge
Approximately 14 Stitches and 11 rows every 4 inches.
Size
5 Suggested Sizes. Measured flat before joining.
- 3” wide X 16” long
- 4” wide X 18” long
- 5” wide X 20” long laying flat before joining. (Shown) An average adult head size.
- 5” wide X 22” long
- 5” wide X 24” long
This headband is slightly stretchy. The length will stretch 1-2 inches. Therefore, make the ear warmer slightly smaller around than your size.
Changing the Size
The length of the earwarmer can be changed using multiples of 3 + 2. The width can be changed by adding or decreasing rows.
Measure as You Go. If you’re unsure about sizing, measure around the head so you know how big around you need it. If you are not sure of what size to make it. I have a standard head size chart to help you.

Suggested sizes for the average head circumference sizes.
Abbreviations
- CH = Chain
- DC = Double Crochet
- SC = Single Crochet
- SK = Skip
- ST = Stitch
- STs = Stitches
- [ ] = Repeat Between
Materials
Lion Brand Yarn Landscapes. #4 medium weight yarn. Approximately 130 yards.
Colors:
- Cabana
- Mountain Range
Supplies
Crochet Hook Size I 5.5 mm
Tapestry Needle
Scissors
Tape Measure
Faux Leather Tag (optional)
Pattern Notes
Pattern is written in US crochet terminology.
If you measure the headband rather than count the rows, you can use any leftover yarn you happen to have.
You can find You Tube Video step-by-step tutorials for both left hand and right hand crocheters below the written pattern for the blanket stitch.
Crochet Pattern Crochet Ear Warmer Bramble Twist
Start by making a slip knot and adding the loop on the hook.
Work enough chains using multiples of 3 +2 to make the length.
However, here are some suggested starting chains for using a medium weight yarn.
- CH 56 for 16”
- CH 62 for 18”
- CH 68 for 20”
- CH 74 for 22”
- CH 80 for 24”
Row 1
In the 2nd CH from the hook work a SC in the back bump. Continue working a SC in each CH ST back bump across. Turn
Row 2
CH 2, 2DC in Same ST. [SK 2 STs, in the next ST Work (1 SC and 2 DC)]. Repeat until the last 3 STs, end with a SK 2 STs and SC in the last ST. Turn
Rows 3
CH 2, 2DC in Same ST. [SK 2 DC, in the SC ST Work (1 SC and 2 DC)]. Repeat until the last 3 STs, end with a SK 2 STs and SC in the last ST. Turn
Rows 4 and Beyond
Repeat Row 3.
In the last row
CH 1 (Does not count as a ST). SC in the first ST and each ST across. Turn
You can make this as wide as you like.
Here are suggested rows for the other sizes.
- 3 inches = 8 rows
- 4 inches = 10 rows
- 5 inches = 15 rows
When you’re done, leave a long tail. About 15-20 inches. You will be using this to sew the ends together.
Joining the Ends
This photo is of a different headband, but it shows how to fold the ends together for seaming.

Final Steps
Seaming Instructions: Folding and Sewing the Ends Together
- Fold the band in half matching the ends together.
- Fold the ends in half matching one end to the center of the other band.
- The other band fold over the other side to the front.
- Use the long yarn tail and yarn needle to sew the ends together. Starting on one end, insert the hook through all four layers and pull out the other side. Moving the needle over a little, insert it back through the layers and out the other side. Continue working back and forth like this until you get to the other end.
When done, weave in the yarn ends and cut off the excess yarn.
Video Tutorials for Crocheting the Bramble Twist Ear Warmer
Enjoy your beautiful twisted headband.
Crochet Ear Warmer Bramble Twist (Free Pattern + Video Tutorial)
Equipment
- 1 Crochet Hook Size I 5.5 mm
- 1 Tapestry Needle
- 1 Scissors
- 1 Tape Measure
- 1 Faux Leather Tag (optional)
Materials
- 130 yards Lion Brand Yarn Landscapes. #4 medium weight yarn. Approximately 130 yards. Approximately 130 yards. Colors: Cabana Mountain Range
Instructions
- Start by making a slip knot and adding the loop on the hook. Work enough chains using multiples of 3 +2 to make the length. However, here are some suggested starting chains for using a medium weight yarn.130 yards Lion Brand Yarn Landscapes. #4 medium weight yarn. Approximately 130 yards.
- CH 56 for 16”CH 62 for 18”CH 68 for 20”CH 74 for 22”CH 80 for 24”
Row 1
- In the 2nd CH from the hook work a SC in the back bump. Continue working a SC in each CH ST back bump across. Turn
Row 2
- CH 2, 2DC in Same ST. [SK 2 STs, in the next ST Work (1 SC and 2 DC)]. Repeat until the last 3 STs, end with a SK 2 STs and SC in the last ST. Turn
Row 3
- CH 2, 2DC in Same ST. [SK 2 DC, in the SC ST Work (1 SC and 2 DC)]. Repeat until the last 3 STs, end with a SK 2 STs and SC in the last ST. Turn
Rows 4 and Beyond
- Repeat Row 3.
- In the last row CH 1 (Does not count as a ST). SC in the first ST and each ST across. Turn
- You can make this as wide as you like. Here are suggested rows for the other sizes.
- 3 inches = 8 rows4 inches = 10 rows5 inches = 15 rows
- When you’re done, leave a long tail. About 15-20 inches. You will be using this to sew the ends together.
- Joining the Ends
Joining the Ends
- Seaming Instructions: Folding and Sewing the Ends Together
- Fold the band in half matching the ends together. Fold the ends in half matching one end to the center of the other band. The other band fold over the other side to the front.
- Use the long yarn tail and yarn needle to sew the ends together. Starting on one end, insert the hook through all four layers and pull out the other side. Moving the needle over a little, insert it back through the layers and out the other side. Continue working back and forth like this until you get to the other end.
- When done, weave in the yarn ends and cut off the excess yarn.
Notes
Abbreviations
- CH = Chain
- DC = Double Crochet
- SC = Single Crochet
- SK = Skip
- ST = Stitch
- STs = Stitches
- [ ] = Repeat Between
Materials
Lion Brand Yarn Landscapes. #4 medium weight yarn. Approximately 130 yards. Colors:- Cabana
- Mountain Range
Gauge
14 Stitches and 11 rows every 4 inches.Size
The sizes are measured flat before joining.- 3” wide X 16” long
- 4” wide X 18” long
- 5” wide X 20” long laying flat before joining. (Shown) An average adult head size.
- 5” wide X 22” long
- 5” wide X 24” long
Want a copy to keep?
Use the print button on the pattern card to print a paper copy or save the pattern as a PDF to your device for future use. Just make sure to sign up for the newsletter first.