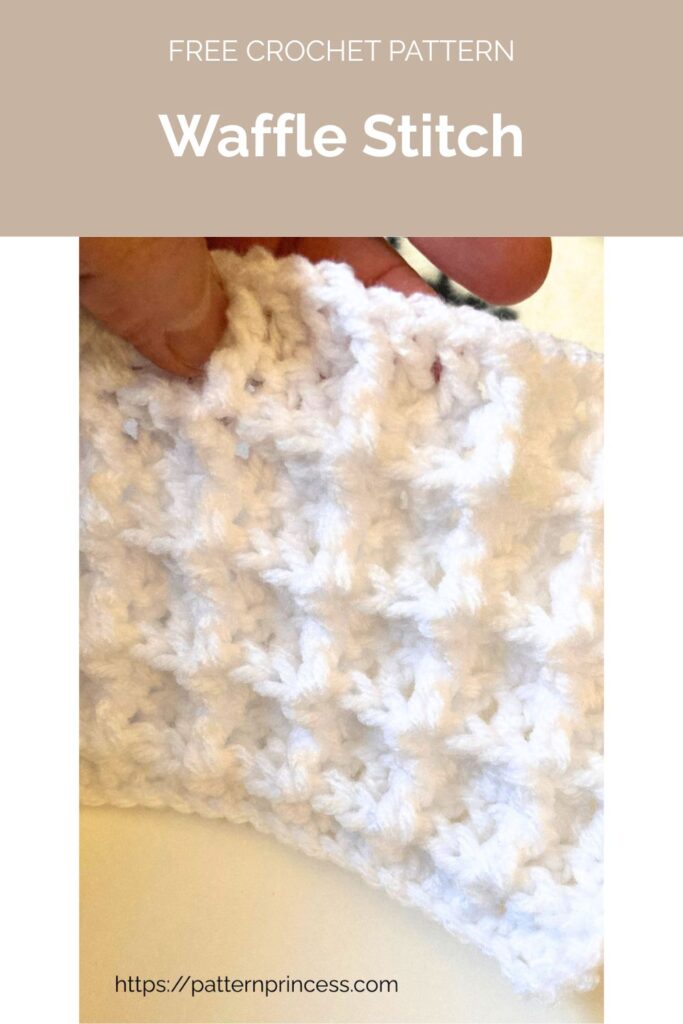
Learn How to Crochet the Easy Waffle Stitch with lots of cozy texture. The waffle stitch is a beautiful and beginner-friendly pattern that adds texture, warmth, and a modern touch to any project. With its grid-like look and squishy feel, this stitch creates a thermal fabric that’s perfect for cozy blankets, dishcloths, and throws.
Don’t let the texture fool you. This pattern is made with an easy two-row repeat that’s great for building confidence. Whether you’re making your first blanket or adding a new stitch to your collection, the waffle stitch is a fun and relaxing technique you’ll use again and again.
It looks amazing in solid shades or bold color combos, making it a versatile go-to for timeless crochet creations .If you’re looking to add rich texture to your next crochet project, the waffle stitch is a must-try. This free waffle stitch crochet pattern is perfect for cozy creations like blankets, throws, and even dishcloths.
Reversable Crochet Stitch
With its soft, grid-like design, the waffle stitch creates a warm and inviting fabric that’s both beautiful and functional. Ideal for chilly days or everyday use.
The waffle stitch may look complex, but it’s surprisingly simple once you get the hang of it. The pattern starts with a basic row of double crochet stitches.
Free pattern by Victoria Pietz from Pattern Princess
Then, in rows 2 and 3, you’ll use a 3-stitch combination of double crochet and front post double crochet. From there, you simply repeat those two rows to build up the classic waffle texture that makes this stitch so popular.
This stitch is great for beginners ready to level up their skills.
The easy two-row repeat is meditative and satisfying to work on, whether you’re making a quick dishcloth or a large throw blanket. The raised grid design traps warmth, making it a smart choice for thermal blankets and cozy winter accessories.

The modern look of the waffle stitch shines in solid colors or bold shades, giving you plenty of creative freedom. Whether you’re crocheting a gift or something special for yourself, this stitch offers both style and substance.
Follow along with the pattern and get ready to crochet something that’s sure to be cuddled and cherished for years to come.
Victoria Pietz from Pattern Princess
Directions: Easy Waffle Stitch: Free Crochet Pattern
Skill Level
Advanced Beginner
Gauge
Approximately 15 stitches and 7 rows in 4” x 4” of stitch pattern
Size
The sample is approximately 4 1/2 inches wide by 4 inches tall.
Materials
This sample pattern was worked using a medium weight yarn.
Supplies
Size I Crochet Hook 5.5mm
Tapestry Needle
Scissors
Tape Measure
Abbreviations
- CH = Chain
- DC = Double Crochet
- FPDC = Front Post Double Crochet
- ST = Stitch
- STs = Stitches
- YO = Yarn Over
- [ ] = Repeat Between
Pattern Notes
Written in US Terms.
Turn at the end of each row.
You may choose to practice the pattern on a small swatch before beginning a larger project. The sample was worked using a foundation chain of 18 stitches.
There are photo tutorials throughout the pattern and video tutorials after the written pattern.
Crochet Stitches Used
Chain Stitch (CH ST)
Begin the chain stitch by making a slip knot on the crochet hook. Leave about a 5-inch tail on the yarn. This will be weaved in later.
Next snug up the yarn loop that is on the crochet hook; while it should be firm, it should also be loose enough to slide on the hook with ease.
Keeping the loop on the hook, insert the hook in the stitch, wrap the yarn over the crochet hook from back to front. Draw the yarn through the loop. Yarn over again and draw the yarn through both loops that are currently on the hook. (The first chain stitch is complete).
HOW TO CROCHET THE CHAIN STITCH video tutorial
Double Crochet (DC)
Yarn over, insert the hook through both loops and pull up a loop. Next, yarn over and pull through two loops on the hook. Lastly, yarn over again and pull through the last two loops on the hook.
HOW TO CROCHET THE DOUBLE CROCHET STITCH video tutorial
Front Post Double Crochet (FPDC)
Front post stitches are raised crochet stitches on the surface of the fabric facing you.
When you work front post stitches, you will insert your hook from the front of your work to the back. Insert your hook the front to the back, so that the post you want to crochet around is in front of your hook.
- Yarn over, insert the hook from front to back between the posts of the first and second double crochet of the row below.
- Then insert the hook from the back to the front between the posts of the second and third stitches. (The hook should now be positioned horizontally in back of the post that you are working around).
- Yarn over, pull the yarn around the post of the stitch. There should now be 3 loops on the hook.
- Yarn over, pull the yarn through 2 loops on the hook.
- Lastly, yarn over again and pull through the last two loops on the hook.
HOW TO CROCHET THE FRONT POST DOUBLE CROCHET video tutorial
If you are a beginner crocheter, we also have a dedicated blog post on how to crochet the front and back post double crochet.
Begin
Begin the chain stitch by making a slip knot on the crochet hook.
Crochet your desired number of stitches using multiples of 3.
The sample uses 18 chain stitches

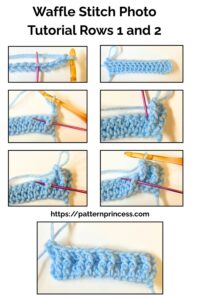
Row 1
In the 5th CH from the hook, work a DC and in each stitch across the row. Turn

Row 2
CH 3 (Counts at the first ST). In the second ST work a FPDC. In the 3rd ST work DC. [1 FPDC, 1 FPDC, 1 DC] Continue working the three stitches across between [ ]. Ending with a DC in the last ST (Which is the top CH of the previous row). Turn
Row 3
CH 3 (Counts as the first ST). In the 2nd ST work a DC, in the 3rd ST, work a DC. For the rest of the row, thinking in groups of 3 work [1 FPDC, 1 DC, 1 DC] Repeat the three stitches across between [ ]. Ending with a DC ST in the top CH of the first CH 3 of the previous row. Turn
Row 4
Repeat Row 2
Row 5
Repeat Row 3
Row 6 and Beyond
Continue repeating rows 2 and 3.
Finishing
After you work the last SC ST, cut off the yarn leaving about a 12-inch long tail. Pull the yarn tail through the last loop on the hook.
Thread the yarn needle with the yarn tails and weave them through the crochet stitches back and forth until the yarn feels secure. Snip off the excess yarn.
If you are a beginner crocheter, you can find more detail on finishing your crochet project on the website.
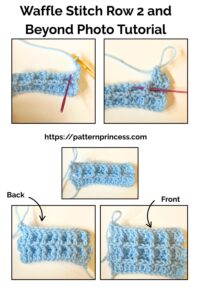
Visual Tip: Take a look at the photo below to see how you can “read” your stitches. Notice how some stitches are pushed back (those get a regular dc) and others pop forward (those get a fpdc). Once you spot the texture difference, keeping track of your waffle stitch pattern becomes second nature!
🧶 How to “Read” Your Stitches in the Waffle Stitch Pattern
One of the best tricks for working the waffle stitch is learning to “read” your stitches by how they sit in the row below. This becomes especially useful once you’re into the row repeat, like on Row 3 and beyond.
- If the stitch from the previous row looks pushed back or flat, that’s a front post double crochet (FPDC) from the row below. In the current row, you’ll work a regular double crochet (dc) into the top of that stitch.
- If the stitch looks raised or pushed forward toward you, it was a regular double crochet in the previous row. In this row, you’ll work a front post double crochet (FPDC) around the post of that stitch.
Think of it like alternating raised bricks and recessed mortar lines—your FPDCs create that lovely textured grid, and your dc stitches fill in the rest. Once you see the pattern, it becomes easy to follow without constantly counting!
Crochet Video Tutorials of the Waffle Stitch Crochet pattern
We hope that you have enjoyed this lovely crochet pattern.
XO
Vicky & Casey
Easy Waffle Stitch: Free Crochet Pattern
Equipment
- Size I 5.5mm crochet hook
- Tapestry Needle
- Scissors
Materials
- Yarn Medium Weight
Instructions
Begin
- Begin the chain stitch by making a slip knot on the crochet hook.
- Crochet your desired number of stitches using multiples of 3.
- The sample uses 18 chain stitches
Row 1
- In the 5th CH from the hook, work a DC and in each stitch across the row. Turn
Row 2
- CH 3 (Counts at the first ST). In the second ST work a FPDC. In the 3rd ST work DC. [1 FPDC, 1 FPDC, 1 DC] Continue working the three stitches across between [ ]. Ending with a DC in the last ST (Which is the top CH of the previous row). Turn
Row 3
- CH 3 (Counts as the first ST). In the 2nd ST work a DC, in the 3rd ST, work a DC. For the rest of the row, thinking in groups of 3 work [1 FPDC, 1 DC, 1 DC] Repeat the three stitches across between [ ]. Ending with a DC ST in the top CH of the first CH 3 of the previous row. Turn
Row 4
- Repeat Row 2
Row 5
- Repeat Row 3
Row 6 and Beyond
- Continue repeating rows 2 and 3.
Finishing
- After you work the last SC ST, cut off the yarn leaving about a 12-inch long tail. Pull the yarn tail through the last loop on the hook.
- Thread the yarn needle with the yarn tails and weave them through the crochet stitches back and forth until the yarn feels secure. Snip off the excess yarn.
Notes
- CH = Chain
- DC = Double Crochet
- FPDC = Front Post Double Crochet
- ST = Stitch
- STs = Stitches
- YO = Yarn Over
- [ ] = Repeat Between
Want a copy to keep?
Use the print button on the pattern card to print a paper copy or save the pattern as a PDF to your device for future use. Just make sure to sign up for the newsletter first.